少し前にこのブログをApache2+PHP7環境に移行してWordPressの動作が速くなった。
ついでにWebサーバーもApache2より速いと噂のOpenLiteSpeedに変えてみたら更に速くなった。
そんなOpenLiteSpeed(とPHP7)でWordPressを動かすところまでを書く。
環境
- Debian GNU/Linux 8.8 (jessie)
- OpenLiteSpeed 1.4.26
- PHP 7.1.6
- MySQL 5.5
必要なパッケージを入れる
[code]
apt-get install curl gcc make g++ zlib1g-dev libpcre3-dev libssl-dev libgeoip-dev libxml2-dev libpng-dev libexpat1-dev
[/code]
OpenLiteSpeedのビルドとインストール
libssl-devを入れてるのになぜかconfiugre実行時OpenSSLをビルドしてくれる。よくわからないけど動くからOK。
[code]
wget http://open.litespeedtech.com/packages/openlitespeed-1.4.26.tgz
tar vzxf openlitespeed-1.4.26.tgz
cd openlitespeed-1.4.26/
./configure –with-openssl=/usr –enable-http2
make
make install
[/code]
OpenLiteSpeed用PHP7のインストール
OpenLiteSpeedは専用のAPIでPHPを呼び出すらしいのでカスタムなPHPが必要。
aptリポジトリを追加してインストールできる。
PHPで必要そうなモジュール類は適当に入れる。
[code]
echo "deb http://rpms.litespeedtech.com/debian/ jessie main" > /etc/apt/sources.list.d/lst_debian_repo.list
wget -O /etc/apt/trusted.gpg.d/lst_repo.gpg http://rpms.litespeedtech.com/debian/lst_repo.gpg
apt-get update
apt-get install lsphp71 lsphp71-common lsphp71-curl lsphp71-dbg lsphp71-json lsphp71-mysql lsphp71-opcache lsphp71-modules-source lsphp71-sqlite3
[/code]
起動・停止・再起動
起動
[code]
/usr/local/lsws/bin/lswsctrl start
[/code]
停止
[code]
/usr/local/lsws/bin/lswsctrl stop
[/code]
再起動
[code]
/usr/local/lsws/bin/lswsctrl restart
[/code]
管理画面
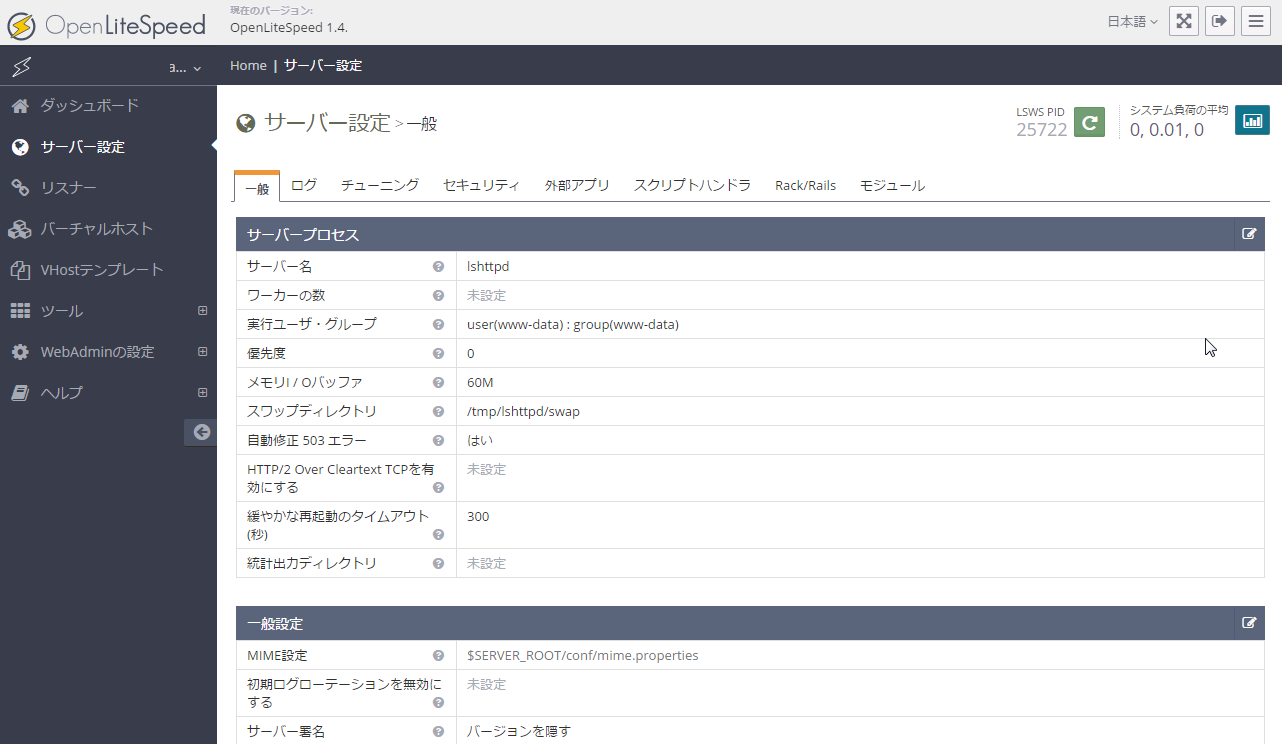
OpenLiteSpeedにはWebで見れる管理画面がついている。基本的な設定はすべてここから行える。
URL: https://[address]:7080/
ユーザー名・パスワード(初期): admin/123456
PHPの設定
PHP7をインストールしたにも関わらず、管理画面を見るとPHP5が設定されているので、それをPHP7に変える。
管理画面 » サーバー設定 » 外部アプリ » 編集
コマンド: $SERVER_ROOT/fcgi-bin/lsphp5 → $SERVER_ROOT/lsphp71/bin/lsphp
バーチャルホストの追加
管理画面から設定できる。適当に追加する。
リスナーの設定
80と443の2つを追加し、両方に追加したバーチャルホストを割り当てる。
SSLの設定
Let’s Encrypt証明書を使う前提で書く。
Let’s Encrypt証明書の取得
[code]
apt-get install git
git clone https://github.com/letsencrypt/letsencrypt
cd letsencrypt
./letsencrypt-auto certonly –webroot -w ドキュメントルート -d ドメイン -m 適当なメールアドレス –agree-tos
openssl dhparam 2048 -out /etc/letsencrypt/live/ドメイン/dhparam.pem (DHキー交換を使う場合)
[/code]
管理画面 » リスナー » SSL
秘密鍵ファイル: /etc/letsencrypt/live/ドメイン/privkey.pem
証明書ファイル: /etc/letsencrypt/live/ドメイン/fullchain.pem
証明書チェーン: はい
プロトコルバージョン: 必要なものを指定する(基本的にTLSだけでよいはず)
暗号: 必要なものを指定する
(設定例)ECDHE-RSA-AES128-GCM-SHA256:ECDHE-ECDSA-AES128-GCM-SHA256:ECDHE-RSA-AES256-GCM-SHA384:ECDHE-ECDSA-AES256-GCM-SHA384:DHE-RSA-AES128-GCM-SHA256:DHE-DSS-AES128-GCM-SHA256:kEDH+AESGCM:ECDHE-RSA-AES128-SHA256:ECDHE-ECDSA-AES128-SHA256:ECDHE-RSA-AES128-SHA:ECDHE-ECDSA-AES128-SHA:ECDHE-RSA-AES256-SHA384:ECDHE-ECDSA-AES256-SHA384:ECDHE-RSA-AES256-SHA:ECDHE-ECDSA-AES256-SHA:DHE-RSA-AES128-SHA256:DHE-RSA-AES128-SHA:DHE-DSS-AES128-SHA256:DHE-RSA-AES256-SHA256:DHE-DSS-AES256-SHA:DHE-RSA-AES256-SHA:AES128-GCM-SHA256:AES256-GCM-SHA384:AES128-SHA:AES256-SHA:AES:CAMELLIA:DES-CBC3-SHA:!aNULL:!eNULL:!EXPORT:!DES:!RC4:!MD5:!PSK:!aECDH:!EDH-DSS-DES-CBC3-SHA:!EDH-RSA-DES-CBC3-SHA:!KRB5-DES-CBC3-SHA
ECDH鍵交換を有効にする: 使うなら「はい」
DHキー交換を有効にする: 使うなら「はい」
DH パラメタ: /etc/letsencrypt/live/ドメイン/dhparam.pem
SSL再交渉保護: 使うなら「はい」
SPDY/HTTP2を有効にする: HTTP2を使う場合は「HTTP/2」を指定する
WordPressのインストール
適当に入れる
[code]
wget https://ja.wordpress.org/wordpress-4.8-ja.tar.gz
tar vzxf wordpress-4.8-ja.tar.gz
apt-get install mysql-server
mysql -u root -p
Enter password:
Welcome to the MySQL monitor. Commands end with ; or \g.
Your MySQL connection id is 43
Server version: 5.5.55-0+deb8u1 (Debian)
Copyright (c) 2000, 2017, Oracle and/or its affiliates. All rights reserved.
Oracle is a registered trademark of Oracle Corporation and/or its
affiliates. Other names may be trademarks of their respective
owners.
Type ‘help;’ or ‘\h’ for help. Type ‘\c’ to clear the current input statement.
mysql> CREATE DATABASE wordpress;
Query OK, 1 row affected (0.00 sec)
mysql> GRANT ALL PRIVILEGES ON wordpress.* TO "wpuser"@"localhost"
-> IDENTIFIED BY "nullpodesune";
Query OK, 0 rows affected (0.00 sec)
mysql> FLUSH PRIVILEGES;
Query OK, 0 rows affected (0.00 sec)
mysql> EXIT
Bye
[/code]
rewriteルールの設定
管理画面 » バーチャルホスト » Rewrite
Rewriteを有効にする: はい
Rewrite ルール: 以下のような感じで適当に
[code]
RewriteBase /
RewriteRule ^/index\.php$ – [L]
RewriteCond %{REQUEST_FILENAME} !-f
RewriteCond %{REQUEST_FILENAME} !-d
RewriteRule . /index.php [L]
[/code]
HTTP2のServer Pushを使う場合
WPでServer Pushをしたい場合は、テーマの編集からfunction.phpに以下のようにプッシュさせたいファイルのパスをLinkヘッダで指定すればプッシュしてくれる。
[php]
<?php
header("Link: </wp-content/themes/twentyseventeen/style.css?ver=4.8>; rel=preload; as=stylesheet;");
[/php]
参考にしたページ
UbuntuでOpenLightSpeedを試してみる – Qiita
OpenLiteSpeedの導入からWordPress動作まで – Netassist Blog
http://open.litespeedtech.com/mediawiki/index.php/Help:Install:Command_Line
https://geekflare.com/http2-litespeed-web-server/


コメント